I just discovered lately Bittorrent Sync and found it to be an amazing way to replace dropbox or any other Cloud Storage since I’m owning a server and a raspberry pi.
Technology
Bittorrent Sync
Sync uses advanced peer-to-peer technology to share files between devices. No cloud is required. This means there are no accounts, no file size limits, and transfer speeds are never throttled. You are free to share anything and everything you have. How it works.
ECryptfs
To summarize, ecryptfs is an encrypted filesystem. You set up the passphrase and the algorithm you want to use and it create an encrypted filesystem that is accessible only when mounted. When not mounted, the data are unreadable.
H5ai
H5ai is a file browser made in PHP.
My Use
I wanted to keep my data encrypted on my server and synchronized using Bittorrent Sync. But I also wanted to have an access to these file from the outside through a browser without the need to sync my whole folder.
Setup
Ecryptfs
Creating the ecryptfs as described here : http://www.howtoforge.com/how-to-encrypt-directories-partitions-with-ecryptfs-on-debian-squeeze
First point is to be sure you have the ecrypt fs builded with your kernel, either as a module or directly into it. Then you need to install the utils that goes with it. Finally doing the first mount that will create the filesystem. Usually you mount on itself the directory. I also created a directory /files/ where I’ll put the file synced with Bittorrent Sync.
sudo apt-get install ecryptfs-utils
root@server1:~# mount -t ecryptfs /home/sync /home/sync
Passphrase: <-- some_passphrase
Select cipher:
 1) aes: blocksize = 16; min keysize = 16; max keysize = 32 (not loaded)
 2) blowfish: blocksize = 16; min keysize = 16; max keysize = 56 (not loaded)
 3) des3_ede: blocksize = 8; min keysize = 24; max keysize = 24 (not loaded)
 4) twofish: blocksize = 16; min keysize = 16; max keysize = 32 (not loaded)
 5) cast6: blocksize = 16; min keysize = 16; max keysize = 32 (not loaded)
 6) cast5: blocksize = 8; min keysize = 5; max keysize = 16 (not loaded)
Selection [aes]: <-- ENTER
Select key bytes:
 1) 16
 2) 32
 3) 24
Selection [16]: <-- ENTER
Enable plaintext passthrough (y/n) [n]: <-- ENTER
Enable filename encryption (y/n) [n]: <-- ENTER
Attempting to mount with the following options:
 ecryptfs_unlink_sigs
 ecryptfs_key_bytes=16
 ecryptfs_cipher=aes
 ecryptfs_sig=bd28c38da9fc938b
WARNING: Based on the contents of [/root/.ecryptfs/sig-cache.txt],
it looks like you have never mounted with this key
before. This could mean that you have typed your
passphrase wrong.

Would you like to proceed with the mount (yes/no)? : <-- yes
Would you like to append sig [bd28c38da9fc938b] to
[/root/.ecryptfs/sig-cache.txt]
in order to avoid this warning in the future (yes/no)? : <-- yes
Successfully appended new sig to user sig cache file
Mounted eCryptfs
root@server1:~# mkdir /home/sync/files
Now you have your filesytem created and mounted. You’ll have to do the same procedure at each mount or you can set as automount as explained in the link I posted.
Bittorrent Sync
For the Windows client, it’s really easy, just download and install the last version on the website and follow the wizard.
But for the Linux (debian) version, it can be a little more tricky, hopefully I found a unofficial repository that is packing BtSync. To install BtSync on a Debian or Ubuntu, you just need to launch an installation script provided on the link that will add a new repository in your source list. You follow the wizard and install btsync.
sh -c "$(curl -fsSL http://debian.yeasoft.net/add-btsync-repository.sh)"
sudo apt-get install btsync
BtSync will help you to configure your first instance of the program. It will generate the needed file into /etc/btsync you should have a file named debconf-default.conf containing this :
//!/usr/lib/btsync/btsync-daemon --config
//
// Default instance automatically created by debconf
//
// DO NOT EDIT THIS FILE MANUALLY - SERIOUSLY!!!
//
// THIS FILE WILL BE OVERWRITTEN AT EVERY UPDATE
// OR RECONFIGURATION SO DO NOT EVEN TRY IT
//
// USE dpkg-reconfigure btsync INSTEAD TO MODIFY
// THE CONFIGURATION
//
// DAEMON_UID=btsync
// DAEMON_GID=btsync
{
 "storage_path" : "/var/lib/btsync/",
 "check_for_updates" : false,
 "display_new_version": false,
 "disk_low_priority" : true,
 "lan_encrypt_data" : true,
 "rate_limit_local_peers" : false,
 "folder_rescan_interval" : 600,
 "folder_defaults.delete_to_trash" : true,
 "folder_defaults.use_dht" : false,
 "folder_defaults.use_lan_broadcast" : true,
 "folder_defaults.use_relay" : true,
 "folder_defaults.use_tracker" : true,
 "folder_defaults.known_hosts" : "",
 "webui" :
 {
 "listen" : "0.0.0.0:8888",
 "force_https" : true,
 "ssl_certificate" : "/etc/btsync/debconf-default.crt",
 "ssl_private_key" : "/etc/btsync/debconf-default.key"
 }
}
I first copied the default configuration in the same directory with another name and then I modified the “storage_path” to the place where I created my ecryptfs. I also disabled the generated conf by adding .bak to the end. Since the startup script is only loading .conf files.
cp debconf-default.conf myconf.conf

mv debconf-default.conf debconf-default.conf.bak
vim myconf.conf
Nginx + Php + h5ai
I consider that you have already an installation of php with Nginx or apache. You just need to unpack the h5ai in /home/sync/files/ and correctly set the index. I provide some example of configuration that I use for Nginx SSL with .htpasswd + php5-fpm.
- Example of pool for php5-fpm
[sync]

listen = /var/lib/php5-fpm/sync.sock
listen.owner = www-data
listen.group = www-data
listen.mode = 0660

user = btsync
group = btsync

pm = ondemand
pm.max_children = 3
pm.process_idle_timeout = 10s;
pm.max_requests = 0

chdir = /

php_admin_value[open_basedir] = /usr/share/php5:/tmp/:/home/sync/
php_admin_value[session.save_path] = /tmp
php_admin_value[upload_tmp_dir] = /tmp
- Example of nginx configuration with SSL and Htpasswd :
server {
 listen 80;
 listen [::]:80;
 server_name cloud.example.com;
 return https://$server_name$request_uri; # enforce https
}

server {
 listen 443 ssl spdy;
 listen [::]:443 spdy;

 ssl on;
 ssl_certificate /home/crypt/aaflalo.me.crt;
 ssl_certificate_key /home/crypt/aaflalo.me.key;
 server_name cloud.example.com;
 root /home/sync/files/;

 access_log XXXX;
 error_log XXXXX;

 fastcgi_buffers 64 4K;

 #index index.php;
 index index.html index.php /_h5ai/server/php/index.php;
 location ~ ^/(data|config|\.ht|db_structure\.xml|README) {
 deny all;
 }
 location / {
 auth_basic "Server Restricted";
 auth_basic_user_file /home/sync/.htpasswd;
 location ~ ^(.+?\.php)(/.*)?$ {
 try_files $1 = 404;
 include fastcgi_params;
 fastcgi_param PATH_INFO $2;
 fastcgi_param HTTPS on;
 fastcgi_param SCRIPT_FILENAME $document_root$fastcgi_script_name;
 fastcgi_pass unix:/var/lib/php5-fpm/sync.sock;
 fastcgi_read_timeout 120s;
 }

 location ~* ^.+.(jpe?g|gif|png|ico|css|zip|tgz|gz|rar|bz2|doc|xls|exe|pdf|ppt|html?|txt|tar|mid|midi|wav|bmp|rtf|js|swf|avi|mp[3-4]|mpe?g|mkv|iso|r[0-9+]|srt|ass|7z|iso)$ {
 #forcing browser to cache locally static content for 1 day, set this longer as needed.
 expires 28d;

 aio on;
 directio 512;
 output_buffers 1 512k;
 sendfile off;
 }

 }

}
Setting up a folder in BtSync
Now that our configuration is ready let’s setup a folder on the main computer that will be synced on the encrypted server.
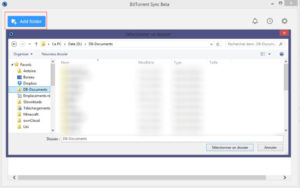
- Add Folder :

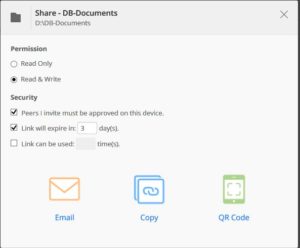
- Generate a link by hovering the added folder and clicking on the button Share :

- Copy the link and go the web gui of BtSync on your server on the set port.
You need to set a password and login for the first time. Keep them in mind you’ll need them at each connection. Your browser will surely complain about the certificate that is self-signed (if you chose in the install to force-https), no problem at all, your connection will still be secured. - In the web gui click on the Link button and paste the link :

- It asks you where to put the file, choose the folder you have created with ecryptfs (/home/sync/files/) and let it sync.
- Enjoy your encrypted cloud.
Using h5ai
If you set up h5ai you can now also access your file directly from anywhere in the world.

Leave a Reply